Part of what distinguishes professional printing from home-printing is the ability to extend your graphics to the paper’s edges. This is only possible because of a thing called ‘bleed’, so it’s safe to say bleed is pretty important! Get to know all about this thing called bleed, and safety zones, in this quick guide…
What is Bleed?
Simply put, bleed is an additional 3mm at each edge of your artwork. So, an A5 flyer measures at 148mm x 210mm but, with bleed, it becomes 154mm x 216mm.
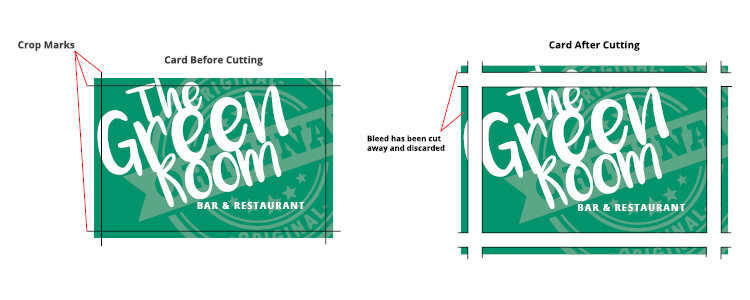
Why is this necessary? Well, this 3mm overprint acts as a safety net in case the guillotine blade doesn’t come down exactly on the edge of your artwork. Without bleed, the guillotine might cut ever so slightly to the left and you’d have a slither of white appear on the edge of your product. Take a look at the example below to see how bleed gets cut away.
How much bleed do you need?
3mm is the industry standard but you should always check with your printer in case they require something different. For example, we ask for 3mm on all our products except our PVC banners which need 25mm instead.
What is the Safety Zone?
Bleed and the Safety Zone are often talked about together because they’re two sides to the same process. If the guillotine can cut too wide, it could cut also too close and crop your design. Nobody wants that so you should avoid putting any important design features near the edges – in other words, you create a safety zone.
 How much do you leave for a safety zone?
Again, 3mm is the standard for safety zones but this is more likely to vary between products. See here for the exceptions that we ask for with our products;
– Leave a 7mm safety zone on bound edges of stapled/perfect bound booklets
– Leave a 9mm safety zone on bound edges of wiro-bound booklets
– Leave a 36mm safety zone on PVC banners
Can I Create Bleed After Finishing the Design?
The easiest way to create bleed is before you’ve even started the design process. Make your design canvas 6mm bigger in height and width than your finished product and remember to take this into account when marking your safety zone. That being said, if the artwork is no longer editable but does not include bleed, all is not lost.
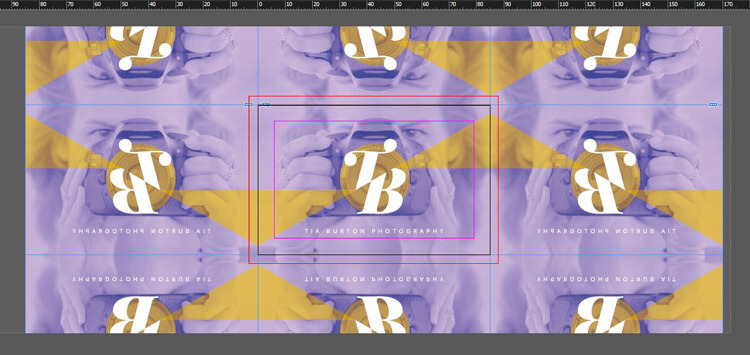
The mirror technique creates a false bleed by reflecting your design on each edge.
1. Copy your design onto a canvas that includes room for bleed.
2. Create 8 copies of the artwork.
3. Flip two copies vertically and connect them to the top and bottom edge of your artwork.
4. Flip two copies horizontally and connect them to the left and right edges of your artwork.
5. Flip the other four vertically and horizontally and fill in the corners.
6. Crop away the excess.
 Hopefully, this has cleared up any questions you had on bleed or safety zones! Remember, if you have any more queries or issues creating your artwork, our team are happy to help. You can call us on 02920 363600 or email sales@printingwales.com, 9am-4:30pm, Monday to Friday, and we’ll find the solution for you.